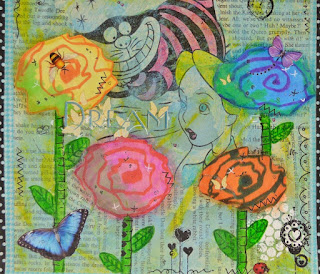
It's Lisa S here to host the new challenge this fortnight and it's all about Kids/Teens. We want to see creations featuring the younger generation. With that in mind I'm sharing a mixed media tutorial using my daughter's art. Don't panic, anyone can do mixed media and no experience is necessary. I promise!
Mixed Media Tutorial
For starters, select what you want to work on. I am using a page from my art journal but you can literally do mixed media on anything. (chipboard, paper mache, heavy card stock, canvas, wood etc.)
?
The next decision is to decide what you want your base to be. I used book paper but you could also use a letter, poetry or a song that your kid/teen wrote. Patterned paper works too and if I am working on a canvas I like to use paint or sprays. When working with something sentimental be sure to copy it first and save the original. Note: I use a heat tool (an old blow dryer set to low) to set each step along the way so I begin again on a dry surface. 
Now you want to start adding color and texture. I chose transparent acrylic paints which I brushed on and used punchinella to start the texture process. Stencils, stamps, bubble wrap, shelf liner & anything with a pattern are all ways to add texture. When using stamps be sure to use a permanent ink like Ranger's Archival or Staz-On.
This is the point where I brought her artwork in by fussy cutting her roses and decoupaging them to my page. Below is her original.
Drawn by Sara S. at age 6
Stems & leaves were created freehand with Faber Castell Pitt Pens which are great for shading and
adding color. Use any marker you like but be sure it is permanent when dry or it will smear. To shade I outline the image with a matching color and use my finger to blend the color in. Shading anchors your image to the page so it's an important step. 
Now more texture, I love rub ons because their fun, come in a variety of designs and their inexpensive. Black rub ons tend to add depth while white & colored ones add light and bring the image forward. Once your project is finished you will want to seal them by brushing decoupage glue over them. 
You can add journalling in many ways but I loved this rub on that spelled DREAM because it ties in with my Alice in Wonderland theme. Your computer is an easy way to generate words or phrases and doodling will help emphasize them. Another alternative is a Dymo Label maker which gives a retro feel to your work. Note: Ches & Alice were colored with Faber Castell Pitt Pens to balance the color out on this page.
A few close ups


I added the polka dot washi tape because the blue was just too light. A simple fix! 
This is truly art from the heart.
I hope you've enjoyed this tutorial and that it will inspire you to create a fun piece of artwork with your children, grandchildren or nieces & nephews. Mixed media is SO much fun and I have more tips, techniques and examples on my blog so I hope you'll check that out too. Thanks for hanging in there!
Fab sponsors of the Kids/Teens Challenge:
Kenny K
Digi and rubber stamps from Kenny K are a fun and edgy way to add the perfect dose of attitude and style to all of your creations! The creator, the artist, the man: Kenny K is a NYC-born professional illustrator who has brought his funky-but-slick, urban-influenced look to the card making and paper crafts world. His signature style can be seen throughout his various collections of sexy pin-up babes, sweet 'n sassy girls, cool rockin' dudes, kid?s stuff, retro characters and more at KennyKDownloads.com.
Many thanks to Kenny K for providing the team with images to create with!
Fred She Said $20 voucher! 
Tracey from Fred She Said says:
Fred She Said Designs offers a wide variety of digital products with a floral flair and cute characters too - Digi's, Pre-coloured images, Papers, Sets, and Fred's Flower Kits. Have some fun with Fred!
Guest Designers from Kenny K
Source: http://toptiptuesday.blogspot.com/2012/11/challenge-90-kids-teens.html
sag awards red carpet torrey pines nhl all star game 2012 pollyanna samuel adams snowy owl one for the money


No comments:
Post a Comment
Note: Only a member of this blog may post a comment.